Friday, June 27, 2014

Runway Inspired Challenge #62

Turns out I had a bit of creativity left in me tonight before I get to bed early, so I am playing along with Runway Inspired Challenge #62.  Here is the inspiration picture:

http://www.runwayinspired.blogspot.com/2014/06/ric62-adeam.html

http://www.runwayinspired.blogspot.com/2014/06/ric62-adeam.html

I was inspired by the dark blue and white space in this dress, plus the fluidity of the skirt.  I made a stencil using my Cameo that looks like falling confetti.  I used my Faded Jeans Distress Inks to color in the spots, then I went simple by putting the sentiment on a plain banner.  I added the little birdie just because.  :) 


I am happy with how it turned out, yet I realize it probably should be a bit darker.  But I digress.  :)  I am also entering this card into this week's Simon Says Stamp Wednesday Challenge, where the theme is anything goes! 

Anyway, now that is it for today!  Hopefully I will survive girl scout camp tomorrow and will be back soon with more!

Until then...
 photo Signature_zps1df7bf72.png

Color Throwdown #298

Happy Friday, everyone!  I've spent the day laying low and resting up because I get to be a camp mom with my daughter's Girl Scout troop when they go back to day camp tomorrow.  I came across the color swatch for this week's Color Throwdown and decided to quickly play along.

Here is the swatch:

http://colorthrowdown.blogspot.com/2014/06/color-throwdown-298.html

And here is the card I made: 


I used a light kraft cardstock base for the Crumb Cake color and then used SU Wisteria Wonder, Spun Sugar Distress Ink and white dye ink to make the colors pop off the kraft color better.  I used a new (to me) stamp set, which is from the Studio Calico Camelot card kit.  I love how they are layer stamps to make as big or as small of a cake as you want.  I used some pink, cream and clear sequins to finish of this super fast, super simple card.

Here is a closer look:


I am also entering this in this week's Simon Says Stamp Wednesday challenge, where the theme is anything goes!  

That is all for today!  Wish me luck that I survive a full day of being outdoors!  This non-outdoorsy girl is kind of freaking out!  ;)

Until next time...
 photo Signature_zps1df7bf72.png

Wednesday, June 25, 2014

CAS(E) this with Fusion

 Good morning!  I am playing along with the CAS(E) this sketch and Fusion Card Challenge this week!  Here are the inspiration picture and sketch:

http://fusioncardchallenge.blogspot.com/2014/06/fusion-teaming-up-with-case-this-sketch.html

And here is my card:


I don't have much in the way of gold, but I thought this paper from My Mind's Eye's Flair collection had some gold tones to it.  I also used Pumice Stone distress ink for the sentiment, which also looked a bit goldish to me as well. 

I took a queue from a previous card I made when it came to the banner strip in the background.  It's actually a cardlift of a card I lifted, if that makes sense.  I love how this card turned out, though.  The ombre paper on top of the pretty, subtle florals, on top of yummy woodgrain paper.  And with enamel dots to boot?  I'm a happy girl.

That's all for this morning.  Thanks for stopping by!

Until next time...
 photo Signature_zps1df7bf72.png

Tuesday, June 24, 2014

CAS? Yes, please!

Happy Tuesday, friends!  Today I played along with a couple fun challenges and I wanted to share what I made.  I used the layout and pattern from Poppy Sketches:

http://poppysketches.blogspot.com/2014/06/poppy-sketch-7.html

And I used some colors and patterns from Cure for the Monday Blues:

http://littlemisst-papercraft.blogspot.com/2014/06/cure-for-monday-blues-challenge-22.html
 
Here is what I made:


I used a new (to me) stamp set from WPlus9 for this card.  For the polka dot pattern, I used the feathers from the set...so cute!  I loved the soft, muted colors and stripes from the Cure for the Monday Blues picture so I decided to use a light pink and light minty green for this card.  It turned out very CAS (clean and simple) and I am really pleased with the finished product!

That is all for today!  Thanks for stopping by!

Until next time...
 photo Signature_zps1df7bf72.png

Saturday, June 21, 2014

Little Tangles #39: Watercolor

Happy Saturday, friends!  Today I am playing along with this week's Little Tangles challenge.  The theme is watercolor and if you've been following me at all lately, you know how much I am loving anything watercolor related right now.  I was all over this challenge! 

http://littletangles.blogspot.com/2014/06/challenge-39-watercolor.html

Here is the card I made:


I used the stamp block technique that I learned in the watercolor class by Online Card Classes.  I used Picked Raspberry and Broken China distress ink and some coordinating sequins to finish it off


I love how fun this turned out!  And it was SUPER quick to put together.  I love cards like that.

That is all for today!  I'll be back soon with some other cards soon.  There are some great challenges this week!

Until next time...
 photo Signature_zps1df7bf72.png

Friday, June 20, 2014

Feeling Happy


Have you ever sat down to create something just because and came out the other end with a smile on your face?  That's what happened to me tonight.  I sat down to play with a new stamp set I got recently, Favorite Flowers from Simon Says Stamp.  This set is a fun floral layering collection.  I just love it.  Because I need visual inspiration before I scrap or make a card, I used this card I found as my inspiration.     

http://www.sarahjmoerman.blogspot.com/2014/05/simon-says-stamp-june-2014-card-kit.html

And I loved it so much that I pretty much made exact copies.  Imitation is the sincerest form of flattery, right?  ;)  Here are the cards that I made:


I used a 4.25" x 5.5" piece of 110 lb cardstock and stamped the floral pattern all over it.  Then I cut it into two 1.75" x 5.5" strips.  I stamped the sentiment and then added enamel dots to finish them off.  My favorite colors, my favorite embellishments, my favorite things (layering stamps).  It's Smile City over here.  :) 


Both cards are pretty exact except for the color placement/sizes of the enamel dots.  Brainless duplication at it's finest. 


I just love how these cards turned out and I can definitely see myself doing more like this in the near future.

That's all for tonight.  Until next time...

 photo Signature_zps1df7bf72.png

Thursday, June 12, 2014

More with Distress Inks and Stencils

I had so much fun playing with stencils and Distress Inks in my last post, that I decided to do it again.  I am playing along with a couple more challenges this week, so let's get started!

First off, I am playing along with Cure for the Monday Blues.  Here is the photo prompt:


I was inspired by the pink in the comforter, the brightly colored rug and the black lines in the rug as well.  Here is what I came up with:

  
I created a stencil with my Silhouette using a transparency.  (Which may or may not have taken me over two hours to do, due to trial and error using a different, thicker kind of plastic, and screwing it up many times.)  I masked off the area where I did not want color and then used Picked Raspberry Distress Ink to color in the area shown.  I love the flowers, leaves and feathers in the rug, as they show two-tone coloring.  I tried to mimic that by stamping a distressed-looking stamp with various colors of Distress ink, then using the Paper Smooches feather dies to cut out feather shapes with the two-tone ink on them. 


I love how the feathers turned out.  I used one of the Paper Smooches Streamers dies to cut out the banner, then stamped it with a sentiment from Avery Elle's Handwritten Notes set and Tuxedo Black Memento Ink.  I added some black sequins and a teal base to keep with the color scheme from the picture.

I am super happy with the way this card turned out.  It's kind of out of my comfort zone with all of the layering and such, but I love it!  I am also submitting this card to this week's Simon Says Stamp Wednesday Challenge.  The theme:  stencils!

That is all for today!  Thanks for stopping by!  Until next time...

 photo Signature_zps1df7bf72.png

Tuesday, June 10, 2014

One Card, Three Ways, Four Challenges

There are SO MANY good challenges out in blog land this week.  I was inspired by the colors and sketches of the challenges listed within this post, so I decided to do something different (for me) and make similar cards with varying elements.

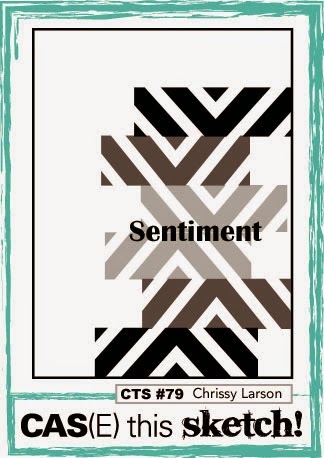
This first card was created for this week's CAS(E) this Sketch challenge!  Here is the sketch: 

http://casethissketch.blogspot.com/2014/06/case-this-sketch-79.html

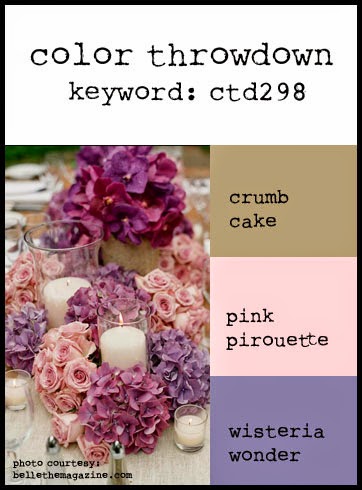
I also used this week's Fusion Card Challenge color prompt as a starting point: 


Now that you've seen the inspiration pictures/sketches, here is the card I made:


I created a stencil with my Silhouette and used my distress inks to fill in the pattern.  I LOVE how it turned out!  I stamped a sentiment from Avery Elle's Aim High set in Versamark and used the most delicious embossing powder ever.  I picked it up from a local stamp shop and it's smooth and shiny.  So pretty! 


You can *kind of* see the shine in the second picture.  I've never seen embossing powder melt so smoothly before.  I'm in love!

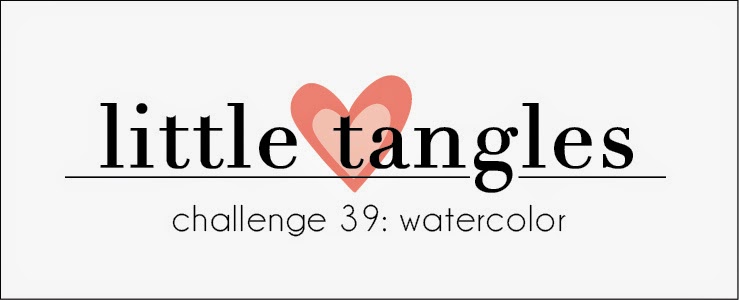
For my second card, I used the same stencil and went off colors from Little Tangles' inspiration photo:

http://www.littletangles.blogspot.com/2014/06/challenge-38-inspiration-photo.html

http://www.littletangles.blogspot.com/2014/06/challenge-38-inspiration-photo.html

Here is the card I created:


I used more of a rainbow effect with this one, but only went through blue. I stamped a sentiment from Neat & Tangled's Just For You set on a round piece of cardstock and embossed it with the same yummy embossing powder from the first card.  


The shine shows up so much better in this picture!  LOVE!!

For my third card, I used this photo prompt from this week's Paper Smooches Sparks Challenge:

http://papersmoochessparks.blogspot.com/2014/06/june-8-14-picture-perfect-challenge.html

Instead of going straight across with the color, like I did in the last two cards, I added it at an angle.  I was able to fit more colors in this way.  I used a sentiment from Paper Smooches' Birthday Sampler set.  I decided to go simple with the sentiment because I didn't want too much to compete with the colors on this card.  I love how it turned out!


Thank you for stopping by today!  I will have more to share soon!  Until then...

 photo Signature_zps1df7bf72.png

Monday, June 9, 2014

CAS(E) This Sketch #79 and a Father's Day Card

Hello!  I'm back today sharing a card I made using this week's CAS(E) This Sketch as a jumping off point.  Here is the sketch:


And here is the card I made: 


This is one of those cards that looks different in your head and doesn't translate well to paper, but I am still happy with the way it turned out.  I colored the balloons using the same ink they were stamped with, only using a waterbrush to apply the color.  I have another idea for this sketch, so I might just have to do some card playing making tomorrow.  :) 


After seeing that I posted the cards I made using distress inks yesterday, my oldest (she's 7) told me she wanted me to put the card up that she made for daddy.  I helped her VERY minimally, only doing the initial embossing stuff, then she took off and did everything else herself.  Didn't she do a great job?!


 Here is the inside:

Here is the back: 

I think it's super cute.  :)  Lately my daughter has been asking if she can copy some of my cards, so I might have to start sharing her creations.  She's more of an artist than I ever will be, so she'll likely knock them all out of the park!  I'm submitting her card in this week's Simon Says Stamp Wednesday's Challenge:  Father's Day/Masculine

That's all for today!  Until next time...
  photo Signature_zps1df7bf72.png

Sunday, June 8, 2014

Playing Catch-Up

Guys, I have a new obsession:  distress inks!  Ok, I know I'm late to the game on this one, but seriously, I love them!  I have been following Jennifer McGuire for a while and she does amazing things with distress inks.  I finally got around to getting all of the minis and have started playing with them. Here are a couple cards I made:


For this first card, I got to use a couple of my Stamping Royalty winnings: the Lil' Inker Dad die and the stamp set that goes along with it.  I love how this turned out.  It's masculine and cool.  I am submitting the card for this week's Simon Says Stamp Wednesday Challenge:  Father's Day/Masculine.  


This second card is one of my faves.  The stamps I used are both Stamping Royalty prizes: Amuse Studio Haunted Mansion Background and the sentiment is from Neat and Tangled's Just for You set. 

For both cards, I started by stamping the background with Versamark ink onto watercolor paper, then embossed it with clear embossing powder.  I used the mini inking tool to brush on the distress inks, then spritzed the paper with water to make the colors blend a bit.  After it dried, I used my iron to iron off the embossing so I was left with a smooth finish on the paper.  On the second card, I didn't have any pink paper that went with the colors on the card, so I used the picked raspberry on the edges of plain cardstock and then mounted the watercolor paper on top.  I love how it pulls the raspberry color out of the card.  

That is all for today!  I'll be back tomorrow with more goodies!  Until then...

 photo Signature_zps1df7bf72.png

Sunday, June 1, 2014

Ribbon Carousel Challenge #94


Hello everyone!  Welcome back for a new round of the Ribbon Carousel Challenge!  This month's theme is Dad's, Grills and Summer Fun, which is appropriate given that pools are open, school is out (at least here it is), and Father's Day is right around the corner.  (And I am in denial about each and every one of those things because I swear it was just the beginning of April...where is time going?!)

So this month I decided to play on the Summer Fun theme.  Here is my card:


I am in love with the way this card turned out.  I used Paper Smooches' Crystal Clear and I Heart Art sets.  I even managed to use a couple of stamps from those sets in unconventional ways, which I am super proud of myself for even trying! The "tree" was created using a flower stem repeatedly in three different ink colors.  The table that the lemonade is sitting on was created using the solid pencil stamp from the I Heart Art set.  I just stamped it one way, flipped it over, then stamped it the other way.  Then once more for the stand.  So fun.  I watercolored the background using a blue ink pad with my water brush.  I did the same to color in the lemonade, using a yellow ink pad with my water brush.  The sentiment was made by masking off certain letters from sentiment stamps to create the wording I needed.

Thanks for letting me show off my card and don't forget to play along for the chance to win a 10-pack of wooden spools!  


 photo Signature_zps1df7bf72.png