Showing posts with label Paper Smooches. Show all posts

Thursday, June 12, 2014

More with Distress Inks and Stencils

I had so much fun playing with stencils and Distress Inks in my last post, that I decided to do it again.  I am playing along with a couple more challenges this week, so let's get started!

First off, I am playing along with Cure for the Monday Blues.  Here is the photo prompt:


I was inspired by the pink in the comforter, the brightly colored rug and the black lines in the rug as well.  Here is what I came up with:

  
I created a stencil with my Silhouette using a transparency.  (Which may or may not have taken me over two hours to do, due to trial and error using a different, thicker kind of plastic, and screwing it up many times.)  I masked off the area where I did not want color and then used Picked Raspberry Distress Ink to color in the area shown.  I love the flowers, leaves and feathers in the rug, as they show two-tone coloring.  I tried to mimic that by stamping a distressed-looking stamp with various colors of Distress ink, then using the Paper Smooches feather dies to cut out feather shapes with the two-tone ink on them. 


I love how the feathers turned out.  I used one of the Paper Smooches Streamers dies to cut out the banner, then stamped it with a sentiment from Avery Elle's Handwritten Notes set and Tuxedo Black Memento Ink.  I added some black sequins and a teal base to keep with the color scheme from the picture.

I am super happy with the way this card turned out.  It's kind of out of my comfort zone with all of the layering and such, but I love it!  I am also submitting this card to this week's Simon Says Stamp Wednesday Challenge.  The theme:  stencils!

That is all for today!  Thanks for stopping by!  Until next time...

 photo Signature_zps1df7bf72.png

Sunday, June 1, 2014

Ribbon Carousel Challenge #94


Hello everyone!  Welcome back for a new round of the Ribbon Carousel Challenge!  This month's theme is Dad's, Grills and Summer Fun, which is appropriate given that pools are open, school is out (at least here it is), and Father's Day is right around the corner.  (And I am in denial about each and every one of those things because I swear it was just the beginning of April...where is time going?!)

So this month I decided to play on the Summer Fun theme.  Here is my card:


I am in love with the way this card turned out.  I used Paper Smooches' Crystal Clear and I Heart Art sets.  I even managed to use a couple of stamps from those sets in unconventional ways, which I am super proud of myself for even trying! The "tree" was created using a flower stem repeatedly in three different ink colors.  The table that the lemonade is sitting on was created using the solid pencil stamp from the I Heart Art set.  I just stamped it one way, flipped it over, then stamped it the other way.  Then once more for the stand.  So fun.  I watercolored the background using a blue ink pad with my water brush.  I did the same to color in the lemonade, using a yellow ink pad with my water brush.  The sentiment was made by masking off certain letters from sentiment stamps to create the wording I needed.

Thanks for letting me show off my card and don't forget to play along for the chance to win a 10-pack of wooden spools!  


 photo Signature_zps1df7bf72.png

Sunday, May 18, 2014

More Watercolor Cards!

http://onlinecardclasses.com/watercolor/


Today is the last official day of the Watercolor for Card Makers class.  Sad face.  But I have genuinely loved EVERY. SINGLE. DAY. of this class.  I've mentioned before that I am not an artist, but I am really good at faking it.  And watercoloring makes anything pretty, so that helps.  :)  I wanted to show you a few cards I made using techniques from three different days.

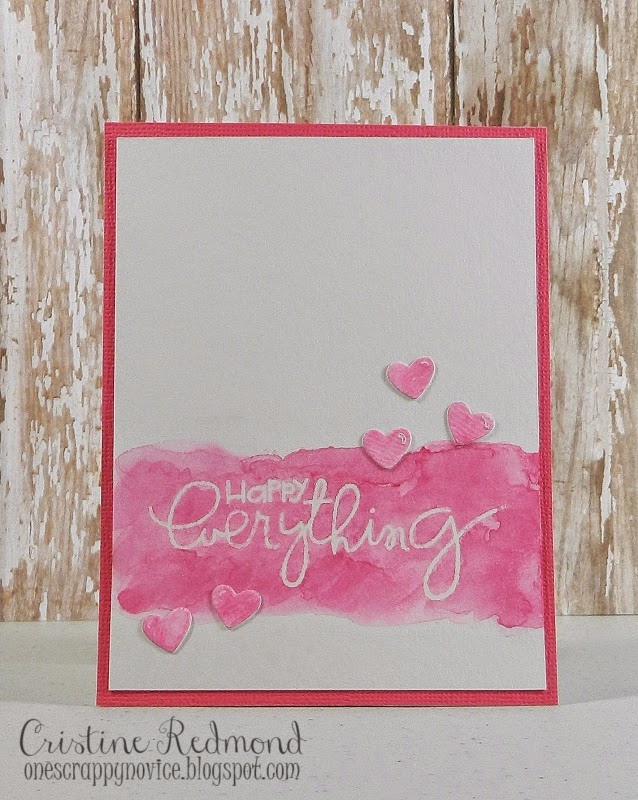
First up, here is a card using the heat embossing/watercolor wash technique I learned on day one.  (I also showed an example of this here.) 


First I drew lines on the page just above and just below where I actually watercolored.  I wanted to make sure I had somewhat straight lines when I was done with this wide border.  Then I stamped my sentiment with Versamark and embossing powder.  Next I used a clean, wet brush to do a water wash where I wanted there to be color.  I then took my brush and dabbed on color and let the water do it's job, spreading the color everywhere I had put water.  I used three varying colors of pink to get what you see.  While I was coloring the wide border, I also did the same thing on a scrap piece of watercolor paper, because I knew I wanted to die cut some hearts to put on the card.  Once the paint was dry, I used my iron to get rid of the embossing powder (put a sheet of paper above and below the watercolor paper).  The embossing powder did not want to come off cleanly, but that just adds to the messy watercolor effect.

It's hard to tell, but I used my clear Wink of Stella glitter pen on the hearts. 


For my next card, I used a technique I learned on day 5:  watercoloring stamped images.


First I stamped my images using my Stampin' Up! ink pads.  Once everything was the way I wanted it, I went back in with the same colored inks and added the watercolor effects.  I added purple inside the flowers to fill them in more, I used the green ink to add shadows on the leaves and I used the blue to give the jar some dimension.  I think it turned out so pretty!  I am submitting this card for this week's Paper Smooches Sparks Challenge theme:  anything goes.  

This next card uses more cards that I made from day 4 of class.  (See another example from this day here.)


I die cut a mustache with watercolor paper and watercolored it with the same Glimmer Mist color I used on the base cards.  Then I stamped the sentiment using similar colors from the card's color scheme.  My 7 year old laughed when she saw this card, so I'd call that a success!  :)  I am submitting this card for this weeks SimonSaysStamp.com Wednesday Challenge, which is Die Crazy!

Thanks for stopping by today!  I'm sure I will have much more to share as I play around some more using techniques I've learned from this amazing class.  Until then...
  photo Signature_zps1df7bf72.png

Monday, April 7, 2014

CAS(E) this Sketch #71

Today I am playing along with this week's CAS(E) this Sketch challenge.  Here is the sketch:

http://casethissketch.blogspot.com/2014/04/case-this-sketch-71.html

And here is my card:


I masked off the center of the card and then used some pearlescent watercolors to create some messy and fun splatters.  I used a dropper and a straw to do the big splatters.  I dropped a big dot of paint on the card, then blew it around to create the movement.  I could not for the life of me get the sentiment to come out cleanly, so I gave up on it.  But otherwise, I love how it turned out!

Thanks for stopping by today!  Until next time...
 photo Signature_zps1df7bf72.png

Monday, January 20, 2014

Fusion Card Challenge: Fusion #2

After dealing with my two girlies who have had the flu for a few days, I decided to get my craft on this weekend.  I came across the Fusion Card Challenge and decided to play along this time around.

Here is the sketch/photo inspiration:
http://fusioncardchallenge.blogspot.com/2014/01/fusion-2.html

And here is the card I made:


Yellow isn't one of my favorite colors, so it was different for me to work with for this challenge.  I am so happy with the way the card turned out, though.  I used my gray ink pad and a water pen to do the shading on the jar and used four different Paper Smooches sets.  For the jar and flowers, I used Crystal Clear; I used part of the "Love" sentiment from Warm Hearts and the heart from Word Salad to make the word "Love"; I used the happy anniversary sentiment and letters from the deepest sympathy stamp from Good Gab to create the rest of the sentiment.  I learned of a stamp masking technique from a Paper Smooches video Savannah O'Gwynn put together.  Stamp masking is NO JOKE.  I started over four times before I finally got this to look the way I wanted it.  It's tedious but man is it cool to be able to create your own sentiment from bits and pieces of a bunch of other stamps!

http://papersmoochessparks.blogspot.com/2014/01/jan-19-25-anything-goes-wk3-challenge.html


I will also be linking this up to this week's Paper Smooches Sparks Challenge: Anything Goes.  Because, why not, right?

Thanks for stopping by!  Until next time...

Photobucket

Tuesday, January 14, 2014

Ribbon Carousel Challenge #89

Hello, hello!  I'm glad to be back today with my very first official post as a member of the Ribbon Carousel Challenge crew! 


I decided to make a get well card because I seem to make a ton of love-themed and birthday cards.  Plus, I wanted another excuse to pull out my Paper Smooches Healthy Vibes stamp set.  :)  Here is my card:

 
To make this card super authentic, I used the corner of a tissue to fill the tissue box.  I have used tissue paper for this in the past as well.  


Be sure to play along with us!  The winner will receive 10 wooden spools filled with your choice of seam binding, baker's twine or May Arts ribbon.  Awesome prize, right?  So link up for your chance to win! 

Thanks for stopping by!  Until next time...


Photobucket

Sunday, January 5, 2014

Happy 2014 Friends!

With the new year comes a new resolution:  KEEP THIS BLOG UPDATED!  While I haven't posted very much, I HAVE been making things and even photographing them.  I just haven't been sitting down to show you all what I have been working on.  That's a bummer and I am going to work on it.  Promise.

One thing that should help me get back into the posting game is this little tidbit...I've been chosen to be on the Ribbon Carousel Challenge Blog Design Team!  I am so super excited about working with such an amazingly talented group of women!  I can't wait to get started! 

I will be back in a few days with my first post, so for now I will leave you with this cute card I made. 


I love the cards I've been seeing with objects inside of the mason jars, so I thought I would take a stab at it.  I think it turned out pretty cute.  (And it certainly can't hurt that I used all of my favorite color combos.  :) )

I'll be back soon to share more, friends!  Hope your 2014 is off to a great start!  Until next time...


Photobucket

Sunday, October 6, 2013

World Card Making Day 2013


Happy (day after) World Card Making Day!  I was able to squeeze in some crafty time yesterday to make a couple cards that I wanted to share with you.  Coincidentally, yesterday was also my husband's birthday, so I decided to put an end to my procrastination to make him a birthday card.  And because I love using my Pinterest pins for inspiration, here is a card I pinned from Kristina Werner that I used as my starting point:


And here is the card I made:


I used My Mind's Eye's Cut & Paste Adorbs collection for this masculine card.  I LOVE how the inspiration card used wood grain cardstock.  I happened to have a sheet lying around that I was too nervous to mess up use, so I took the plunge and used it for the base of my card.  I also used a wood grain patterned paper from the Adorbs 6x6 paper pad to complement it.  


I stamped the banner and sentiment on the coordinating ombre paper with Versamark and embossed it with white embossing powder.  It really makes the sentiment pop off the paper.  A few extra coordinating touches and this card was done!  I love quick and easy cards!

The second card I made is for this week's 10 Minute Craft Dash challenge.  Here is the color scheme:


And here is the card I made:


I used my Silhouette to create a custom patterned paper and I am so thrilled with the outcome!  I used a silver sketch pen to sketch out the spider webs then used the blade to have it and the little bat cut out for me.  I LOVE when an idea in my head comes out the way I planned.  :) 


I stamped the speech bubble with Versamark and covered it with silver embossing powder to go with the silvery shimmer of the spider webs.  I threw on a few other challenge-coordinating accents as well as a silver glitter enamel dot and this was done.  I have to say for as complicated as this card was, I did it FAST!  I had 1 minute and 42.351 seconds left when I finished.  :) 

I hope you all had a wonderfully crafty day yesterday and are enjoying your weekend.  I will be back soon with some fall-inspired cards.

Until next time...


Photobucket

Wednesday, May 22, 2013

Trying something new...

A lot of my scrappy friends have been using watercolors lately on their projects and I have to admit that I love the look of it.  I've said before that I am not an artist.  My 6 year old is better at drawing than I am.  And I have used watercolors in the past...in coloring books when I'm coloring with my girls.  :)

When I saw this weeks Pinspired Challenge, I decided to grab my biggie's watercolor set (she doesn't turn every color black like my youngest does) and try my hand at some boldly-colored ombre designs. I love how both of them turned out!  Here is the challenge picture:


And here are the cards I made:


For this first card, I stamped the watercolor paper with a fun new background stamp I recently got using Versamark, then used clear embossing powder to create a resist for the watercolors.  I brushed the watercolors on from the bottom to the top, so the bulk of the color would be at the bottom of the card.  I added the sentiment with dimensional adhesive to make it stand out.  I like how the ombre effect adds something extra to this simple card.  

Update:  The first card helped me win the challenge!  :)


For my second card, which ironically I made first and didn't realize I was going to be making two cards with such similar-colored backgrounds, I used some washi tape to mask off the edges to create a border.  Once the paint was dry, I stamped the sentiment with Versamark and then used white embossing powder to make the sentiment look crisp against the colored background.
    
 That is all for today!  Until next time...


Photobucket

Sunday, May 12, 2013

Happy Mother's Day

Happy Mother's Day to all of the mothers out there!  I hope you all are having a blessed day with your families!  I wanted to show off what I was up until 11:15pm last night making made for my mom and my MIL. :)

Here are the cards I made:


I stamped these flower stamps in grey ink and then used colored pencils to color them in.  I even tried something new (to me) - shading!!  I am in no way, shape or form an artist so this was pretty big for me.  :)  Once I was done coloring in the images, I used mineral spirits and a paper pencil to blend them in.  This smooths out the lines and evens up the color. 

Here is what I made for my MIL:


Other than putting pictures in a big album for her, I've never really made anything for my MIL before.  I wanted to take the picture I took of her and her kids at Mother's Day last year and make it into a nice framed piece.  I took a piece of 8x8 chipboard and sprayed it with adhesive.  Then I placed a piece of burlap over it.  I just layered everything else on top and this is how it turned out.  I'm proud of it, so I hope she liked it!  (I was home with a sickie today, so I didn't get to see her reaction.)

This is what I made for my mom:


My mom goes by Mimi and I'm sad to say that there is not a lot of Mimi-personalized things out there.  I thought I'd take some vinyl that I just got and make her a frame of her own.  I used my Silhouette to cut out the sentiment.  It was super easy and fast to make.  My kind of project!  

That is all for now! Hope you all have a wonderful Sunday afternoon!

Until next time...

Photobucket

Thursday, May 9, 2013

Teacher Appreciation Week

Today I am back (finally) with some new goodies to show off!  I've been busy this week making things for my girlies' teachers and I am excited to show you what I've made!

First up is the card I made for my biggie's Kindergarten teacher:


I saw a youtube video earlier this week which Kelly Marie created for a new release preview - which I plan on buying, btw.  :)  I loved the idea of creating a chalkboard to write on, so I made my own version of the stamp she used.  I also used my Paper Smooches Smarty Pants set and then made my own little piece of chalk to finish it all off.  I think it turned out super cute!

This is the gift my daughter and I decided to give her teacher.  Her teacher loves the color green.  What's more green than bamboo?  We thought it would be fun to give her a card saying that we feel lucky to have her as our daughter's teacher.  That's exactly what I did:


I used a piece of paper stamp that I found on clearance (nice!) and then used my Lawn Fawn Sally's ABC's set for the sentiment.  Then I wrapped the pot with some green washi tape and it was finished.  My biggie thought it turned out perfectly!

For my youngest daughter's teachers, I decided to something a bit more special.  My oldest had them for her teachers two years ago, so we feel especially blessed that they are in our lives for another year.  These are the cards I made for them, which you may have seen previously for a tutorial I did for Scrapbook Steals


I thought I'd use another tutorial that I did for Scrapbook Steals and make them both beaded necklaces.  One of the teachers loves the color pink and the other is a K-State grad and fan, so I hope they enjoy what I made for them:

 
I decided to pull out my Smarty Pants stamp set again to make personalized and embellished gift bags, in lieu of making a gift tag.  Here is how they turned out:


Didn't these turn out fun!?  This is the first year that I've gone all out for Teacher's Appreciation week and I'm so pleased with the way everything turned out. 

I hope you enjoyed my post today!  I'll be back soon with more to show off!

Until next time...


Photobucket

Wednesday, March 20, 2013

Everywhere a butterfly...

Happy first day of Spring, everyone!  Seems kind of like it's been spring all winter long here, minus the few weeks we had 20 inches of snow on the ground from back-to-back blizzards in February.  Mother Nature is one bipolar chick, that's for sure!

Anyway, I have a couple cards I wanted to share today.  I used butterflies on both of these cards, which I have never done before.  Whenever I've seen or pinned a card with butterflies on it, I always thought they looked so beautiful and delicate, but I've never been inspired to actually use them before.  Well, until now.  :) 

This first card was commissioned by my brother-in-law.  My sister-in-law gave up a baby girl for adoption a couple years before she and my BIL got married, so they celebrate Birth Mother's Day, which is the day before Mother's Day, every year.  This is the card I came up with:


I wanted to make a card that was happy and pretty and not hokey in any way.  I had to print out the sentiment myself because, let's face it, stamp makers haven't rushed out to make stamps celebrating the incredibly difficult decision of giving up a child.  But I digress...  Here is a close-up:


I have known my SIL for MANY years and I was dating my husband when she was pregnant.  I have been lucky enough to have met the little girl she gave up for adoption a few times as my SIL has been very close with the family who adopted her.  Her birth daughter is a spitting image of her.  Just beautiful.  It was an HONOR to make this card for my BIL to give her this year. 

The second card I am showing you doesn't have quite as exciting of a story, sad to say.  I made it for a challenge.  :)  I actually might be entering it for TWO challenges, so this story is actually looking up a bit.  I made it for this challenge:


And here is what I created:


I wanted this card to be simple with little pops of color, which I think I accomplished.  In retrospect, I wish I would have chosen a paper that didn't have so much white in it, but it still works. 
 

I used a rainbow of colors for the gemstones in the center of the butterflies.  You can't really see them well in this picture, so just try to imagine them.  :)

The other challenge I will be entering this card in is this Paper Smooches Sparks Challenge:


My card isn't SCREAMING these colors, but the butterflies definitely have these colors on them in one way or another. 

Thank you for stopping by today to see my latest creations!  Until next time...

Photobucket