Showing posts with label die cutting. Show all posts

Thursday, September 3, 2015

It's STAMPtember!

It's finally September!  That means cooler days are {supposedly} ahead!  I heart fall and everything it brings.  Another reason I love September?  Because it brings the fun-ness of Simon Says Stamp's STAMPtemberSTAMPtember is full of releases, collaborations and other fun goodies.


I was chosen, along with lots of others, to show off some of the new release items.  I was sent the beautiful Merry Christmas Ornament wafer die to play with.
 http://www.simonsaysstamp.com/product.aspx?id=331993&c=1425

So pretty.  I knew when I saw it that I wanted to make a shaker card.  Here is what I came up with:

 
I used Distress Inks to shade a piece of paper, then I die cut the ornament out of it.  I probably should have done the sentiment a bit darker because it gets lost in the shaker element, but I think it turned out so pretty.  I covered the die cut piece with Wink of Stella clear glitter for a bit of extra shimmer.

That is all for today!  Thanks for stopping by!

Until next time...
  photo Signature_zps1df7bf72.png

Friday, July 17, 2015

CAS(E) this Sketch #132

Guys, I made a card.  I'll wait a few seconds for you to process that.  :)  I have been dealing with a severe case of mojo loss the past few months and I finally feel like I am starting to come out of it.  The last time I made a card and posted it the same day was in March.  It's about time I started getting out of this funk and sharing what I make, don't you think?!

For today's card, I used this sketch from CAS(E) this sketch as a starting point:

http://casethissketch.blogspot.com/2015/07/case-this-sketch-132.html

And here is what I came up with:


I started by masking off the square and then used distress inks over a stencil to create the background.  Then I splattered some Granite Glimmer Mist on it.  I triple cut and layered the "Wishing" sentiment and then created the sentiment banner in Word then cut it to size.  I love how it turned out!

That is all for today!  Thanks for stopping by!  I'll be back with more to share soon!

Until next time...
  photo Signature_zps1df7bf72.png

Friday, April 3, 2015

CAS-ual Fridays Challenge 138: Krafty Bouquets

It's Friday, peeps!  I don't know about you, but this week has been a L.O.N.G. one and I sure am glad the weekend is almost here.  What else makes it great?  It's time for another CAS-ual Fridays challenge!

http://cas-ualfridays.blogspot.com/

As you can see, this month's theme is Krafty Bouquets.  Grab your kraft paper, twine and flowers for this one!  The possibilities are endless!

Here is the card I made:


For this card, I decided to go the non-traditional floral route.  I used the heart note stamp from the Love Notes set along with the hearts from the Heart Board Fri-Dies set to create a simple flower.  I layered watered down Worn Lipstick distress ink on watercolor paper to get a textured look, then die cut it and used the four smallest hearts for the flower.  The heart note stamp was stamped using Mowed Lawn and Peeled Paint distress ink.  I used strawberry stripe twine to finish off the card.

Here is a close up of the flower:


That is it for today!  I hope you will play along with this month's challenge and I can't wait to see what you create!

Until next time...

 photo Signature_zps1df7bf72.png

Monday, January 12, 2015

Runway Inspired Challenge #75

Happy Monday, everyone!  I've got a sickie home from school today so I thought I'd take some time to play with a challenge.  Today I am playing along with Runway Inspired Challenge #75.  Here is the inspiration photo:


And here is the card I made:


I was inspired by the bright pink fabric and the silver detail at the top of the dress.  First, I embossed this beautiful pattern using Versamark and my favorite silver embossing powder.  Then I stamped the sentiment onto the small strip of paper and then backed it with grey cardstock.  Next, I took a scrap piece of super thick cardstock and stamped it directly with Versamark and then covered it with the same embossing powder.  Then I die cut the "sparkle" sentiment and adhered it to the strip using Glossy Accents.

I am not one to be super flashy, so this card is very different for me, but I just love how this turned out.   

That is all for today!  Thanks for stopping by!

Until next time...
 photo Signature_zps1df7bf72.png

Monday, July 7, 2014

A Card For All Challenges

Good Evening!  I am not usually one of those people who can find a million challenges to squeeze one card into, but I am going to have to make an exception for this card.  First, let me show you the card I made:

 
I made the mask/stencil using my Silhouette.  I found the triangle pattern and then removed some of the triangles to come up with this unique pattern.  The card turned out pretty simple, but I didn't want to take away from the background by adding a bunch of stuff.

Now here are the challenges I will be submitting the card to, and why:

http://curtaincallchallenge.blogspot.com/2014/07/curtain-call-inspiration-challenge.htmlhttp://littlemisst-papercraft.blogspot.com/2014/07/cure-for-monday-blues-challenge-23.html
 I pulled the colors from these two challenges.

http://thecuttingedgechallenge.blogspot.com/2014/07/the-cutting-edge-challenge-2.html
 I pulled the clean and simple design, plus the black accents from this challenge.

http://virginiasviewchallenge.blogspot.ca/2014/07/virginias-view-challenge-5.html
And I used the die cut feathers for this challenge.

Like I said, I don't normally do this, so forgive me if this has gone a bit far.  I'm normally a 1-2 challenge per card kind of gal.  :)  

That's it for tonight!  I'm off to watch the weather as a wicked storm just started up!  

Until next time...

 photo Signature_zps1df7bf72.png

Thursday, June 12, 2014

More with Distress Inks and Stencils

I had so much fun playing with stencils and Distress Inks in my last post, that I decided to do it again.  I am playing along with a couple more challenges this week, so let's get started!

First off, I am playing along with Cure for the Monday Blues.  Here is the photo prompt:


I was inspired by the pink in the comforter, the brightly colored rug and the black lines in the rug as well.  Here is what I came up with:

  
I created a stencil with my Silhouette using a transparency.  (Which may or may not have taken me over two hours to do, due to trial and error using a different, thicker kind of plastic, and screwing it up many times.)  I masked off the area where I did not want color and then used Picked Raspberry Distress Ink to color in the area shown.  I love the flowers, leaves and feathers in the rug, as they show two-tone coloring.  I tried to mimic that by stamping a distressed-looking stamp with various colors of Distress ink, then using the Paper Smooches feather dies to cut out feather shapes with the two-tone ink on them. 


I love how the feathers turned out.  I used one of the Paper Smooches Streamers dies to cut out the banner, then stamped it with a sentiment from Avery Elle's Handwritten Notes set and Tuxedo Black Memento Ink.  I added some black sequins and a teal base to keep with the color scheme from the picture.

I am super happy with the way this card turned out.  It's kind of out of my comfort zone with all of the layering and such, but I love it!  I am also submitting this card to this week's Simon Says Stamp Wednesday Challenge.  The theme:  stencils!

That is all for today!  Thanks for stopping by!  Until next time...

 photo Signature_zps1df7bf72.png

Sunday, June 8, 2014

Playing Catch-Up

Guys, I have a new obsession:  distress inks!  Ok, I know I'm late to the game on this one, but seriously, I love them!  I have been following Jennifer McGuire for a while and she does amazing things with distress inks.  I finally got around to getting all of the minis and have started playing with them. Here are a couple cards I made:


For this first card, I got to use a couple of my Stamping Royalty winnings: the Lil' Inker Dad die and the stamp set that goes along with it.  I love how this turned out.  It's masculine and cool.  I am submitting the card for this week's Simon Says Stamp Wednesday Challenge:  Father's Day/Masculine.  


This second card is one of my faves.  The stamps I used are both Stamping Royalty prizes: Amuse Studio Haunted Mansion Background and the sentiment is from Neat and Tangled's Just for You set. 

For both cards, I started by stamping the background with Versamark ink onto watercolor paper, then embossed it with clear embossing powder.  I used the mini inking tool to brush on the distress inks, then spritzed the paper with water to make the colors blend a bit.  After it dried, I used my iron to iron off the embossing so I was left with a smooth finish on the paper.  On the second card, I didn't have any pink paper that went with the colors on the card, so I used the picked raspberry on the edges of plain cardstock and then mounted the watercolor paper on top.  I love how it pulls the raspberry color out of the card.  

That is all for today!  I'll be back tomorrow with more goodies!  Until then...

 photo Signature_zps1df7bf72.png

Sunday, May 18, 2014

More Watercolor Cards!

http://onlinecardclasses.com/watercolor/


Today is the last official day of the Watercolor for Card Makers class.  Sad face.  But I have genuinely loved EVERY. SINGLE. DAY. of this class.  I've mentioned before that I am not an artist, but I am really good at faking it.  And watercoloring makes anything pretty, so that helps.  :)  I wanted to show you a few cards I made using techniques from three different days.

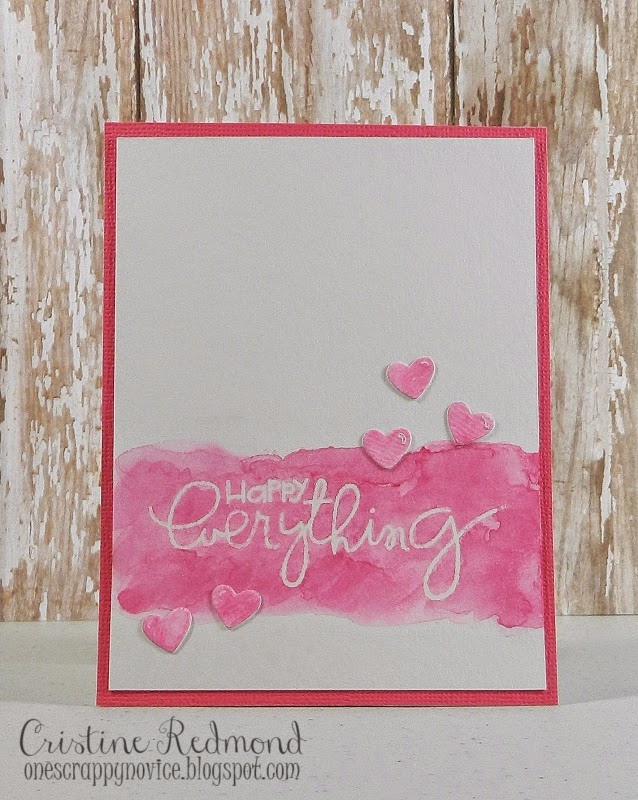
First up, here is a card using the heat embossing/watercolor wash technique I learned on day one.  (I also showed an example of this here.) 


First I drew lines on the page just above and just below where I actually watercolored.  I wanted to make sure I had somewhat straight lines when I was done with this wide border.  Then I stamped my sentiment with Versamark and embossing powder.  Next I used a clean, wet brush to do a water wash where I wanted there to be color.  I then took my brush and dabbed on color and let the water do it's job, spreading the color everywhere I had put water.  I used three varying colors of pink to get what you see.  While I was coloring the wide border, I also did the same thing on a scrap piece of watercolor paper, because I knew I wanted to die cut some hearts to put on the card.  Once the paint was dry, I used my iron to get rid of the embossing powder (put a sheet of paper above and below the watercolor paper).  The embossing powder did not want to come off cleanly, but that just adds to the messy watercolor effect.

It's hard to tell, but I used my clear Wink of Stella glitter pen on the hearts. 


For my next card, I used a technique I learned on day 5:  watercoloring stamped images.


First I stamped my images using my Stampin' Up! ink pads.  Once everything was the way I wanted it, I went back in with the same colored inks and added the watercolor effects.  I added purple inside the flowers to fill them in more, I used the green ink to add shadows on the leaves and I used the blue to give the jar some dimension.  I think it turned out so pretty!  I am submitting this card for this week's Paper Smooches Sparks Challenge theme:  anything goes.  

This next card uses more cards that I made from day 4 of class.  (See another example from this day here.)


I die cut a mustache with watercolor paper and watercolored it with the same Glimmer Mist color I used on the base cards.  Then I stamped the sentiment using similar colors from the card's color scheme.  My 7 year old laughed when she saw this card, so I'd call that a success!  :)  I am submitting this card for this weeks SimonSaysStamp.com Wednesday Challenge, which is Die Crazy!

Thanks for stopping by today!  I'm sure I will have much more to share as I play around some more using techniques I've learned from this amazing class.  Until then...
  photo Signature_zps1df7bf72.png

Saturday, May 17, 2014

Watercolor for Card Makers Day 8

http://onlinecardclasses.com/watercolor/

Yep, that says day 8.  I am kind of skipping around as I haven't really been going in order when I play with the techniques I am learning.  For example, this post is going to contain a card I made last night using a technique from day 1 as well as something I learned from day 8.

Anyway, first up is a card I made using ink pads, stamp blocks and watercolor paper.  Here's the card:


First I stamped some ink onto about the top inch/inch and a half of the stamp block.  Then I spritzed the block with water.  I pushed the ink block onto the watercolor paper and then slowly removed it.  The water tends to want to come up with the block and pools in the area that last touched the paper, so I moved the paper around to get the ink to spread more evenly.  Once this dried, I did another layer because the first layer was too light.  I did this two more times with different colors to get the same effect.  I love the randomness of the colors.  Light in some places and darker in others.  I used a 'Lil Inker stamp/die set that was part of the prize from being one of the winners of Stamping Royalty to finish off the card.  This is such a great masculine card and I can't wait to give it to my dad!  I am also submitting this card to SimonSaysStamp.com's Wednesday Challenge this week.  The theme is die crazy!

These next two cards were made using a technique Laura Bassen showed in class.  She used a die cut out as a mask to create a watercolored image.  I used a flower that I cut with my Silhouette in the same manner. 

For this first card, I used the stencil as a guide while I filled in the holes with paint.  I think this card turned out so pretty.  The watercolors turned out so soft. 


The second card used the same stencil but I used my watercolor pencils for this one.  I traced the shapes with the pencils, removed the stencil, then went over the pencil lines with a water pen to blend the colors together.  The color and shading isn't as subtle on this card, but it still turned out amazing!


That is all for today!  Thanks for stopping by!  I'll have more cards to share tomorrow.  Until then...
 photo Signature_zps1df7bf72.png

Tuesday, May 6, 2014

Watercolor Love

I am in love with watercolor on cards.  That is one of the reasons I'm taking the Online Card Class called Watercolor for Card Makers, which started yesterday.  :)  I can't wait to learn more techniques about watercoloring. 

I made a couple cards over the weekend that I wanted to share today. 


I made the watercolor rainbow by blending pink, yellow and blue together in a strip.  I actually did this twice, once here and once on a scrap piece of watercolor paper, because I wanted to die cut hears out of similar-patterned paper.  Once I adhered the hearts, I cover them with my clear Wink of Stella pen to add some subtle shimmer.  I love how it turned out.


Speaking of loving how a card turned out...this is one of my favorites to date.  I made the watercolor strip before anything else was decided about the card.  Once I went through my stamps, I just knew that this cactus stamp from Sweet Stamp Shop would be the perfect accent for the card.  I'm just in love with this card! 

That's all for today!  Hopefully I will have more to share soon!  Until then...

 photo Signature_zps1df7bf72.png