Showing posts with label Avery Elle. Show all posts

Tuesday, July 15, 2014

AEIHeartU Challenge #11: One Word

 
Hello, All!  I am back after an eventful family trip at the lake and am getting back into the challenge game!  I feel like I am missing out if I am not playing along.  Am I the only one who feels that way? 

Tonight I am playing along with this week's Avery Elle AEIHeartU Challenge

http://aeiheartuchallenge.blogspot.com/2014/07/aeiu-challenge-11one-word.html

Here is the card I made: 


Guys, I am IN LOVE with this card!  It's not often that I finish a card and fall in love with it, but this one definitely did that for me.  I've been anxiously waiting for this Avery Elle Storybook stamp set to make it's way to me.  It's been sold out basically since it debuted.  But man was it worth the wait!

I started by masking off the edge of the white cardstock. Then I stamped the images where I wanted them.  Before I moved on, I stamped the sentiment with Versamark and heat embossed with clear embossing powder.  I wanted the sentiment to pop out from the background.  Then here's the secret next step:  I covered the stamped images with rubber cement!  I knew I didn't want to die cut the images, so covering them with the rubber cement was my next choice. Once the rubber cement was dry, I created the background with Distress Inks.  Seriously, why did I wait so long to jump on the Distress Ink bandwagon??  I rubbed off the rubber cement, colored the images with colored pencils, added some glitter glue to the shooting star, then adhered the whole thing to my card base. 

Here is a close up of what the masking did while I was applying the Distress Inks:
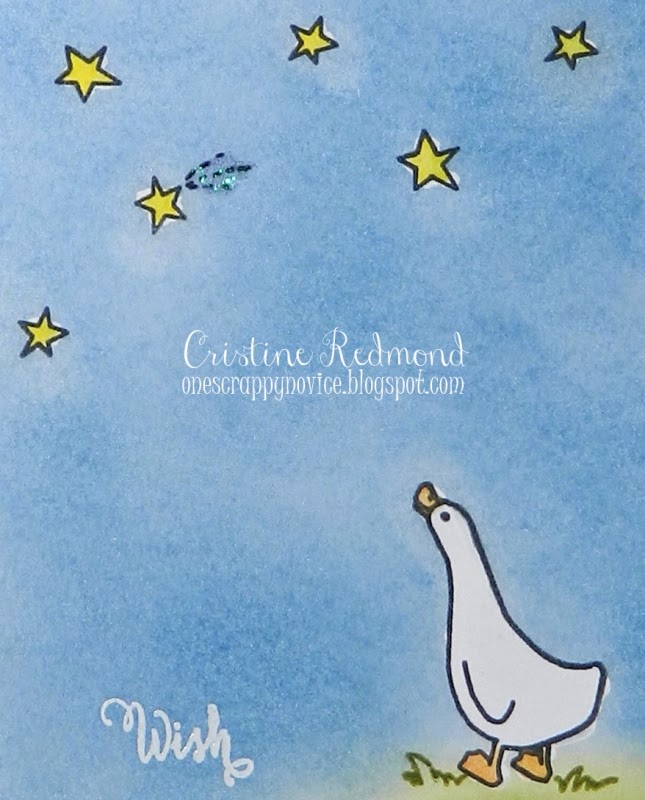
     
If you look closely, you can see where the rubber cement was applied outside of the stamped image line.  I just love it!

That is all for today!  Hope this card makes you as happy as it makes me.  :)

Until next time...


 photo Signature_zps1df7bf72.png

Thursday, June 12, 2014

More with Distress Inks and Stencils

I had so much fun playing with stencils and Distress Inks in my last post, that I decided to do it again.  I am playing along with a couple more challenges this week, so let's get started!

First off, I am playing along with Cure for the Monday Blues.  Here is the photo prompt:


I was inspired by the pink in the comforter, the brightly colored rug and the black lines in the rug as well.  Here is what I came up with:

  
I created a stencil with my Silhouette using a transparency.  (Which may or may not have taken me over two hours to do, due to trial and error using a different, thicker kind of plastic, and screwing it up many times.)  I masked off the area where I did not want color and then used Picked Raspberry Distress Ink to color in the area shown.  I love the flowers, leaves and feathers in the rug, as they show two-tone coloring.  I tried to mimic that by stamping a distressed-looking stamp with various colors of Distress ink, then using the Paper Smooches feather dies to cut out feather shapes with the two-tone ink on them. 


I love how the feathers turned out.  I used one of the Paper Smooches Streamers dies to cut out the banner, then stamped it with a sentiment from Avery Elle's Handwritten Notes set and Tuxedo Black Memento Ink.  I added some black sequins and a teal base to keep with the color scheme from the picture.

I am super happy with the way this card turned out.  It's kind of out of my comfort zone with all of the layering and such, but I love it!  I am also submitting this card to this week's Simon Says Stamp Wednesday Challenge.  The theme:  stencils!

That is all for today!  Thanks for stopping by!  Until next time...

 photo Signature_zps1df7bf72.png

Sunday, May 18, 2014

More Watercolor Cards!

http://onlinecardclasses.com/watercolor/


Today is the last official day of the Watercolor for Card Makers class.  Sad face.  But I have genuinely loved EVERY. SINGLE. DAY. of this class.  I've mentioned before that I am not an artist, but I am really good at faking it.  And watercoloring makes anything pretty, so that helps.  :)  I wanted to show you a few cards I made using techniques from three different days.

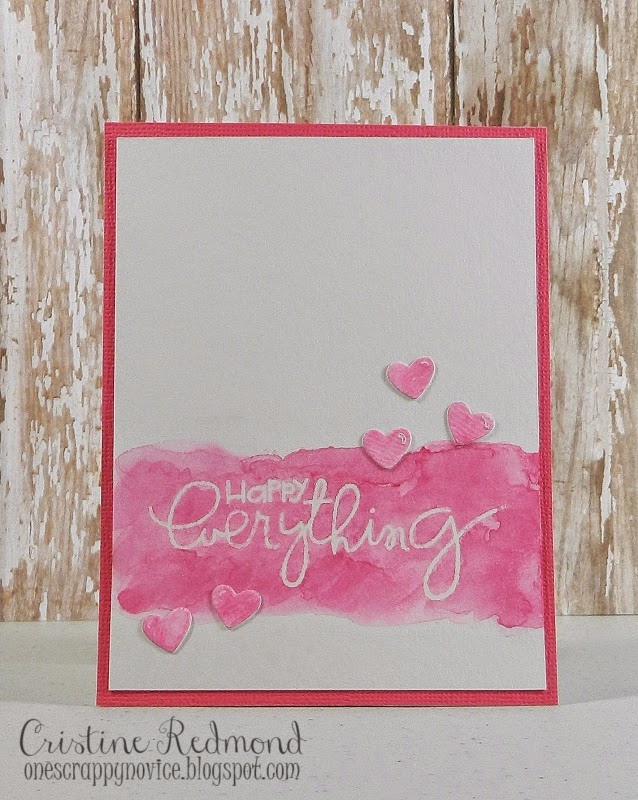
First up, here is a card using the heat embossing/watercolor wash technique I learned on day one.  (I also showed an example of this here.) 


First I drew lines on the page just above and just below where I actually watercolored.  I wanted to make sure I had somewhat straight lines when I was done with this wide border.  Then I stamped my sentiment with Versamark and embossing powder.  Next I used a clean, wet brush to do a water wash where I wanted there to be color.  I then took my brush and dabbed on color and let the water do it's job, spreading the color everywhere I had put water.  I used three varying colors of pink to get what you see.  While I was coloring the wide border, I also did the same thing on a scrap piece of watercolor paper, because I knew I wanted to die cut some hearts to put on the card.  Once the paint was dry, I used my iron to get rid of the embossing powder (put a sheet of paper above and below the watercolor paper).  The embossing powder did not want to come off cleanly, but that just adds to the messy watercolor effect.

It's hard to tell, but I used my clear Wink of Stella glitter pen on the hearts. 


For my next card, I used a technique I learned on day 5:  watercoloring stamped images.


First I stamped my images using my Stampin' Up! ink pads.  Once everything was the way I wanted it, I went back in with the same colored inks and added the watercolor effects.  I added purple inside the flowers to fill them in more, I used the green ink to add shadows on the leaves and I used the blue to give the jar some dimension.  I think it turned out so pretty!  I am submitting this card for this week's Paper Smooches Sparks Challenge theme:  anything goes.  

This next card uses more cards that I made from day 4 of class.  (See another example from this day here.)


I die cut a mustache with watercolor paper and watercolored it with the same Glimmer Mist color I used on the base cards.  Then I stamped the sentiment using similar colors from the card's color scheme.  My 7 year old laughed when she saw this card, so I'd call that a success!  :)  I am submitting this card for this weeks SimonSaysStamp.com Wednesday Challenge, which is Die Crazy!

Thanks for stopping by today!  I'm sure I will have much more to share as I play around some more using techniques I've learned from this amazing class.  Until then...
  photo Signature_zps1df7bf72.png

Saturday, April 5, 2014

Addicted to Watercoloring!

Ok friends, I think I may have watercolor issues now to go along with my enamel dot, wood veneer and burlap twine issues.  I guess there are way worse things to be addicted to, right?

http://aeiheartuchallenge.blogspot.com/2014/04/challenge-4water-color.html


Today I played along with this week's AEIheartU Challenge.  Here is the card I created:


I decided to just watercolor a random background onto watercolor paper using one color.  Next, I stamped the image and sentiment with Versamark and heat embossed them with white embossing powder.  Go figure that heat embossing over watercolor never seems to work out for me (hence the wonky "you" in the sentiment).  But I love everything else about the card, so I am willing to live with it.  :)


I embellished the corners with watercolor splashes and various colors of pink sequins that I got from Avery Elle.  I think it pulled everything together nicely.

I am also created this card for this week's Simon Says Stamp Wednesday Challenge.  The theme is Happy Birthday! 

Thanks for stopping by!  Until next time...
 photo Signature_zps1df7bf72.png

Thursday, April 3, 2014

Watercolor fun.

I have always like to color.  Whenever I was depressed as a young adult, I would pull out my trusty crayons or colored pencils and my favorite coloring books (usually of the Disney-themed variety) and would spend time coloring.  It always makes me happy.  I can't draw to save my life, but coloring sure is the best.

This brings me to last Wednesday.  I was scrolling through facebook as I usually do when an instagram post from Sweet Stamp Shop caught my eye.  Those beautiful watercolor flowers inspired me to try making some of my own.  Keep in mind, I can't draw worth a lick, but I am absolutely in love with the way this card turned out:


I masked off the center with some contact paper that I had cut into a banner shape with a onesie in the middle.  Then I started playing around with the colors, layering as I went along.  For the sentiment, I used two stamps from Avery Elle's Oh Happy Day stamp set.  I masked off the "oh" and the "day" from one stamp to get the "happy" by itself.  I also used my Wink of Stella clear glitter pen on the center of the flowers because everything looks better with a little sparkle.  :)  I think this turned out so cute and I am so excited to send it to a friend of mine who is expecting her second little girl.

That is all for today!  Stop by tomorrow from some pretty awesome news!  Until then... photo Signature_zps1df7bf72.png

Monday, March 24, 2014

Simon Says Glitter It!

Happy Monday, Everyone!  Today I am going to share a card I made for this week's Simon Says Stamp Wednesday Challenge:  Glitter.  If you've been following me as of late, you'll know I am obsessed with my Wplus9 Fresh Cut Florals stamps and Avery Elle Oh Happy Day sentiments.  They just make me so happy and are so beautiful together.

Here is the card I made:


And here is a close-up of the glitter.  I just started using my Wink of Stella glitter pen and I think it will be easy to become obsessed with it.  :)


I am also entering this card in this week's AEIheartU Challenge:

 http://aeiheartuchallenge.blogspot.com/2014/03/challenge-3ombregradient.html

The various colors of blue that I used all work so well together!  Thanks for stopping by today!  Until next time...

Photobucket

Sunday, March 16, 2014

More floral masking...

Sympathy cards are hard for me.  I mean, on the one hand, I want to make them simple and beautiful, but on the other hand, I just really want to make the person I am sending it to smile.  I think I achieved all of that with the card I made for a friend who just lost her dad.

Here is my card:


Just as I did with my card from yesterday, I masked off the center of the card with some contact paper.  Then I stamped the various florals/leaves with my ink, masking off any overlapping flowers to give it more dimension.  I have always admired beautifully inked florals on one-layer cards, so this was new for me to try.  I absolutely LOVE how it turned out.  It makes me feel like I am walking through a field of flowers.

I am entering this card in this week's Curtain Call Challenge, as well as submitting it for Avery Elle's May Guest Designer search.

http://curtaincallchallenge.blogspot.com/2014/03/curtain-call-inspiration-challenge-farm.html

Until next time...
Photobucket

Saturday, March 15, 2014

Ghost Stamping and Masking

http://aeiheartuchallenge.blogspot.com/2014/03/challenge-2embellishments.html

I had some free time to make some cards this week and I can't wait to share them with you.  As you know, my blog states that I am a "novice."  Mostly this just means that I am always learning about/trying new techniques.  The card I am sharing with you today uses a technique I haven't tried before:  ghost stamping with white ink and a darker background.

Here is my card:


I first learned of this technique from the uber-talented Jennifer McGuire.  You can learn about it here and here.  

I masked the center of the card with contact paper and then stamped all of the images I wanted to use with white dye ink.  Next, I stamped the flowers with colored ink and then masked them with post-it's before I stamped all of the leaves.  It's not embellishment heavy (even though I am entering it in the AEIheartU Challenge this week for embellishments), but I threw some enamel dots on it and used my Wink of Stella brush to sparkle up the flower centers.

That is all for today!  I will share another new card tomorrow!  Thanks for stopping by!


Photobucket

Tuesday, February 25, 2014

AEIheartU Challenge #1

Good Morning!  Yesterday I played along with the AEIheartU Challenge blog and I wanted to share what I created.  This week's challenge theme is Happy Birthday. 


Here is the card I created:


I decided to try a new (to me) technique for this card.  I stamped the backgrounds twice, once using regular inks and once using Versamark and clear embossing powder.  For the top layer, I used watercolor paper because I love how the stamped image shows through.  I love the mix of bold and soft colors on this card.

That's all for now!  Thanks for stopping by today.  Until next time...

Photobucket

Tuesday, June 25, 2013

With Sympathy


The afternoon of my gallbladder surgery, I found out that my Uncle had passed away earlier that morning.  My Uncle was a great, great man.  (He's the little guy in the middle of the above picture.)  Raised by ranchers, he was a hard worker through and through.  At almost 78 years young, he never slowed down long enough to retire.  It wasn't in his blood.  I have wonderful memories of him and feel so blessed knowing that he is in Heaven and with my grandparents now.


When I saw the current challenge for Avery Elle stamps, I knew I wanted to use it to create sympathy cards for my Aunt and cousin.  This was the first time I had ever done any kind of floral stamping, so it was fun to try a new technique all while creating something beautiful for my Aunt and cousin.


Aside from my black ink pad being a bit too saturated when I used it, I think they turned out beautifully. 

Thank you for stopping by today to take a look.  Until next time... 

Photobucket